
Ragic CRM Template - A Simple, Effective CRM Solution for Small and Medium Businesses!

Foreword
While CRM tools provide a more solid data management solution, sometimes it could be quite a budget burner. More than often, too, CRM tools can be overly complex, meaning that in the end, a huge proportion of its features might not even be put into use.
While you're still pondering which customer relationship data management method is best for your business, why not give Ragic’s CRM template a try? Install it for direct use if you’re subscribed to Ragic’s Free plan, or adjust its design according to your data management preferences if you're subscribed to the Professional plan or above.
(If you haven’t registered a Ragic account, you can register via this link and install Ragic’s CRM template for free. If you've already had a Ragic account, go to your Ragic homepage, navigate to Start > Install Template, then find the CRM template in the “Sales” template set).
Anyhow, whichever Ragic plan you’re using, you can always refer to this article for a comprehensive explanation about Ragic's CRM template's structure and data flow.
Customer Relationship Management Template Set
This template consists of 9 sheets, which you can install altogether under the set template tab “Sales”.
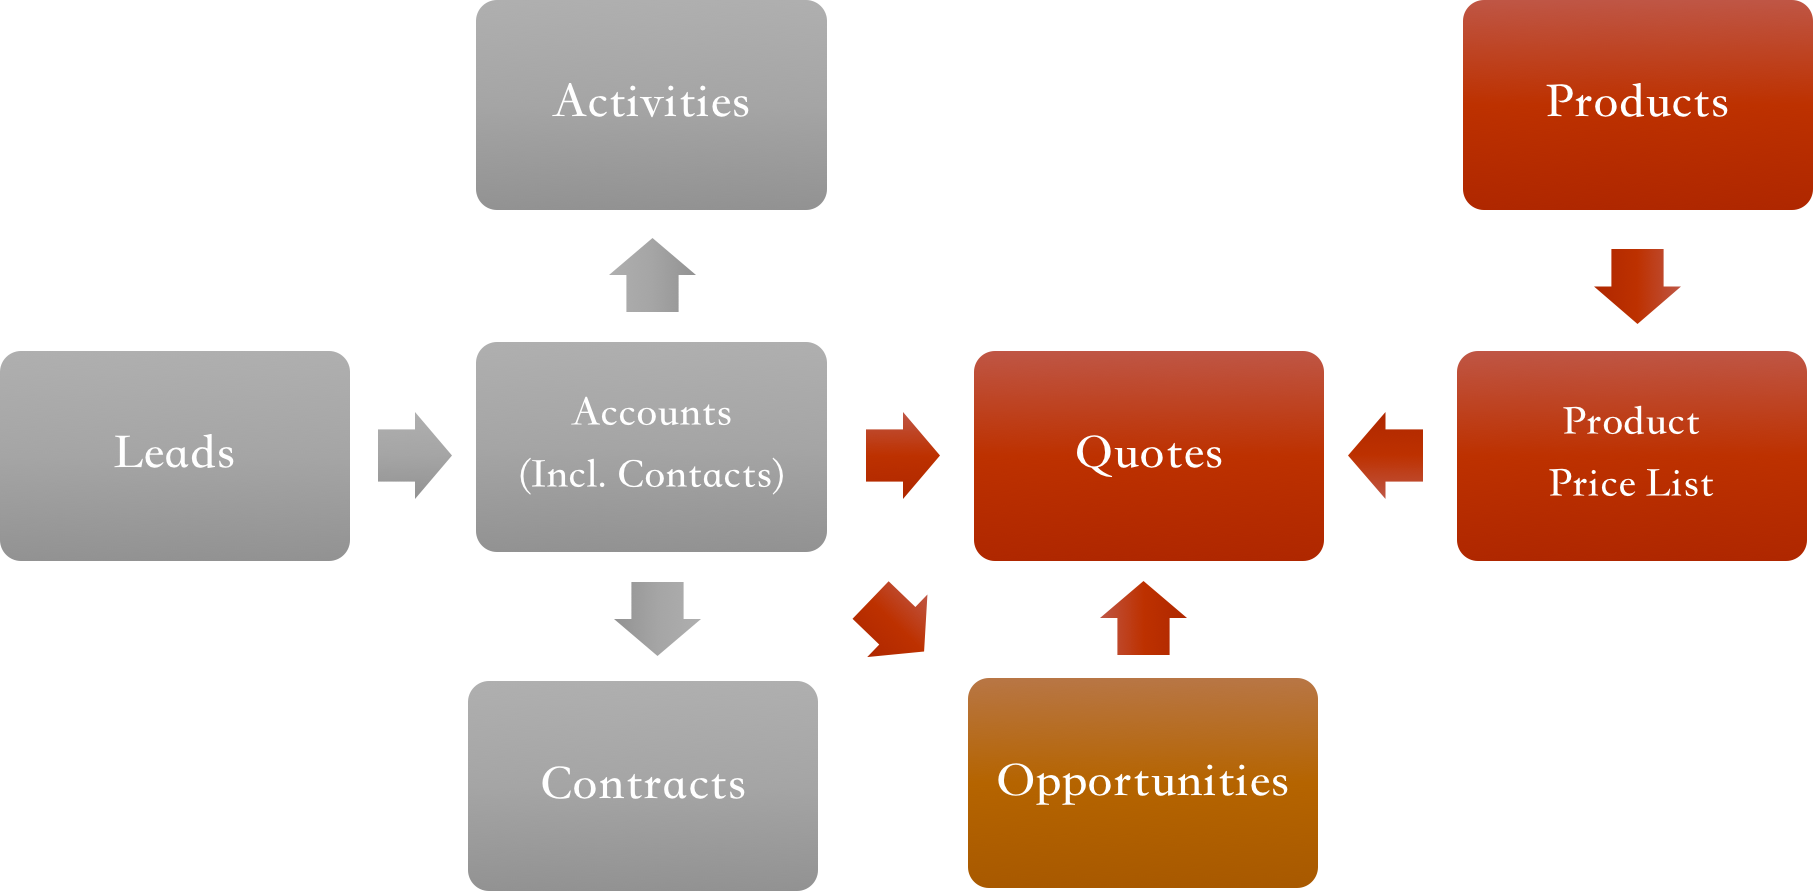
The suggested data input workflow is as following:
(Leads) —> Accounts —> Contacts —> Products (CRM) & Price List —>
(Opportunities) —> Quotes —> Activities —> Contracts
Now let’s check out how each sheet functions and connects the whole CRM template together.
1. Leads sheet
In this sheet, you can record information on people you meet at certain events, people referred to by your business partners or anyone who could potentially become your client. The name of the potential client and his/ her affiliated company/ organization will be the subject of each entry added to this sheet. Thus, each entry includes the potential client’s name, company, and contacts.
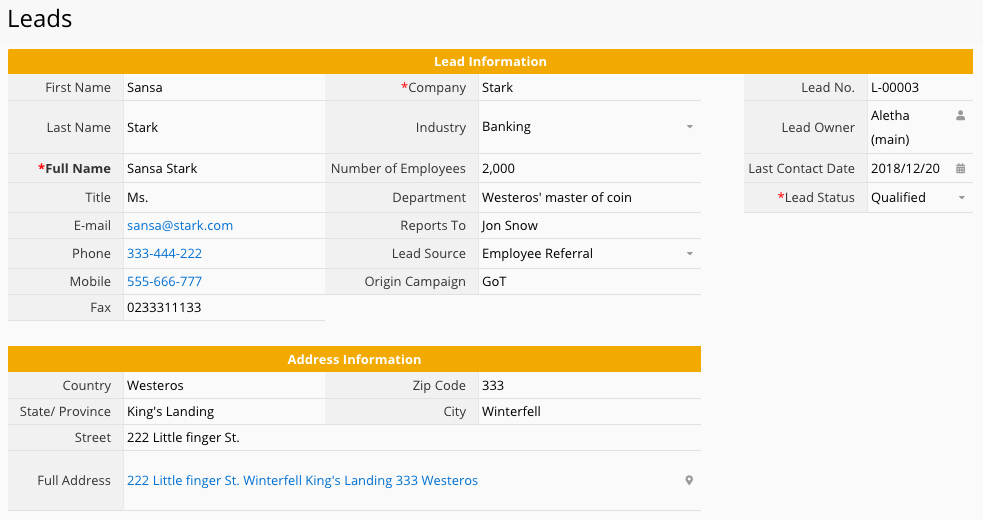
Set the lead status of each newly added entry to “open” to allow the person assigned with this entry to proceed with the follow-up procedure accordingly.
You can record client’s follow-up information in the “Follow-up” subtable. From this subtable, you’ll be able to track how each follow-up detail in this stage is dealt with. In addition, the formula applied to the field “previous follow-up” in the main table of each entry will retrieve the most recent follow-up date in the subtable.

By default, the listing page of the Leads sheet will display entries filtered by the lead status “open” thanks to the applied shared view.

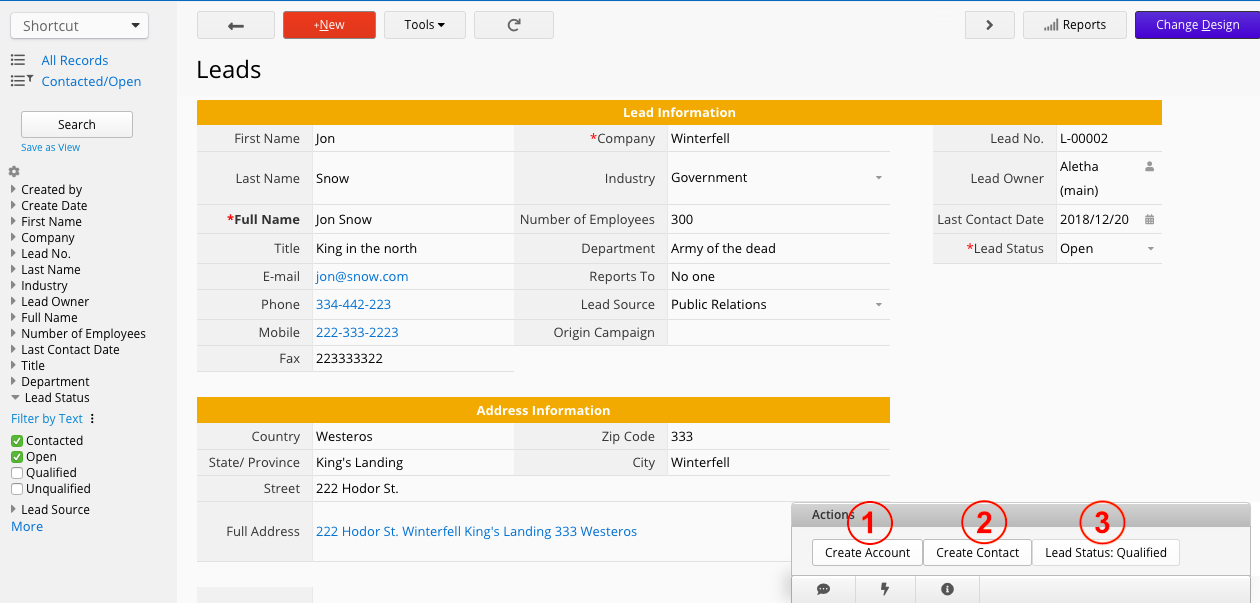
After successfully turning a potential client into an official client through follow-ups and evaluation, clicking (1) Create Account action button will help you create a company Account entry according to the company information in the Leads. Then, you may create the company's Contact information from Leads by clicking (2) Create Contact action button.
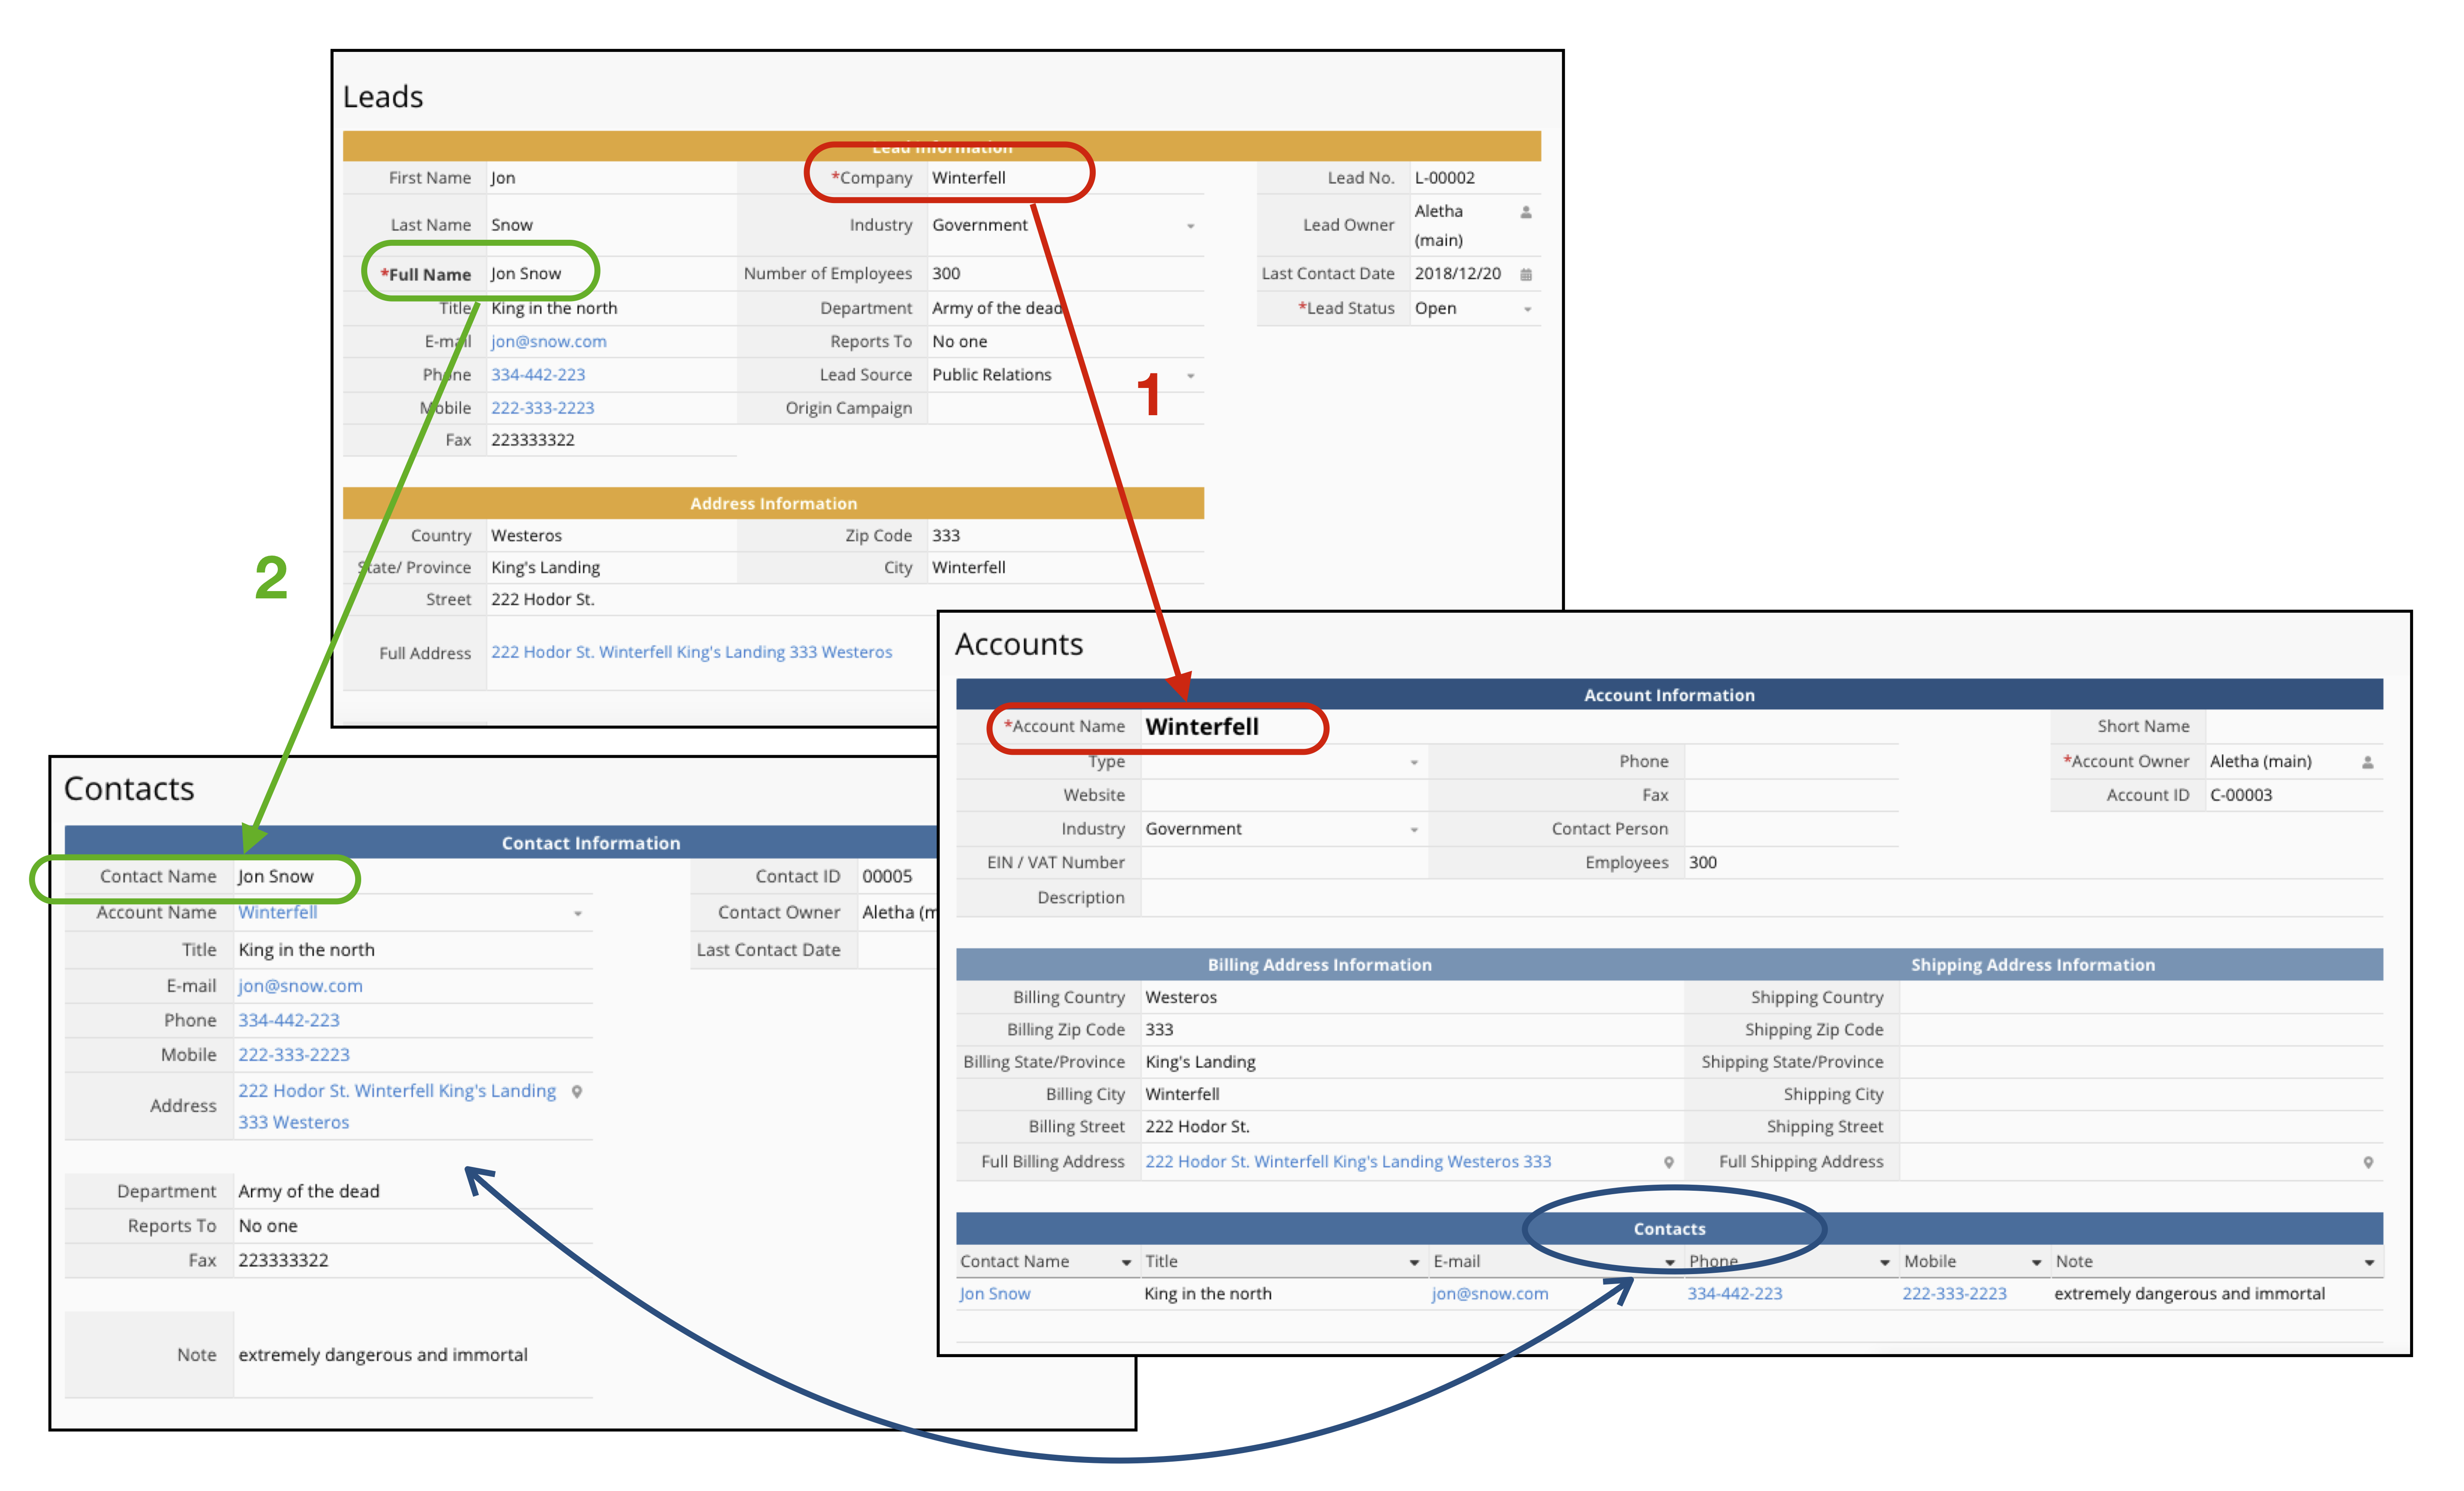
Note: To ensure that each contact person’s information is categorized under and correctly linked to its affiliated company, the correct order of converting a potential client record (Leads) into Account and Contact through action buttons is: (1) “Create Account” —> (2) “Create Contact”.
After confirming that the potential clients’ information are converted into client Accounts and Contacts, you may click the (3) “Lead status: Qualified” action button to change the lead status, or do so manually from the entry form page. This will indicate that the initially “potential” client has been officially converted into a “client”.
2. Account (clients) sheet
With this sheet, you can record and manage the information of all your existing clients (company). Entries can be directly inputted from this sheet or converted from the Leads sheet.
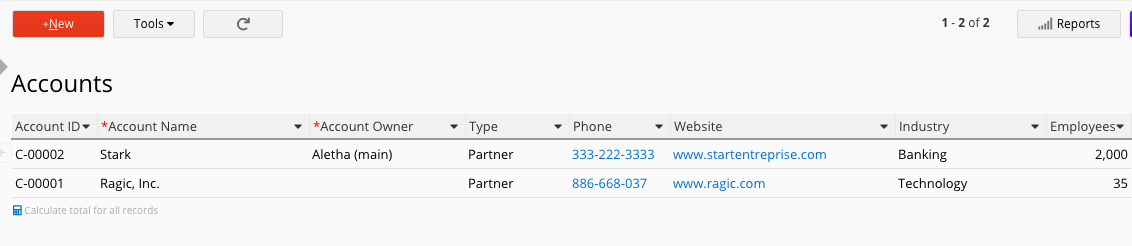
Account sheet description:
General fields (Account Information and Address Information on the top of the form page) include: Account name, VAT number, Phone no., Address, Website, etc., which you can customize and adjust according to the types of the data you'd like to manage.
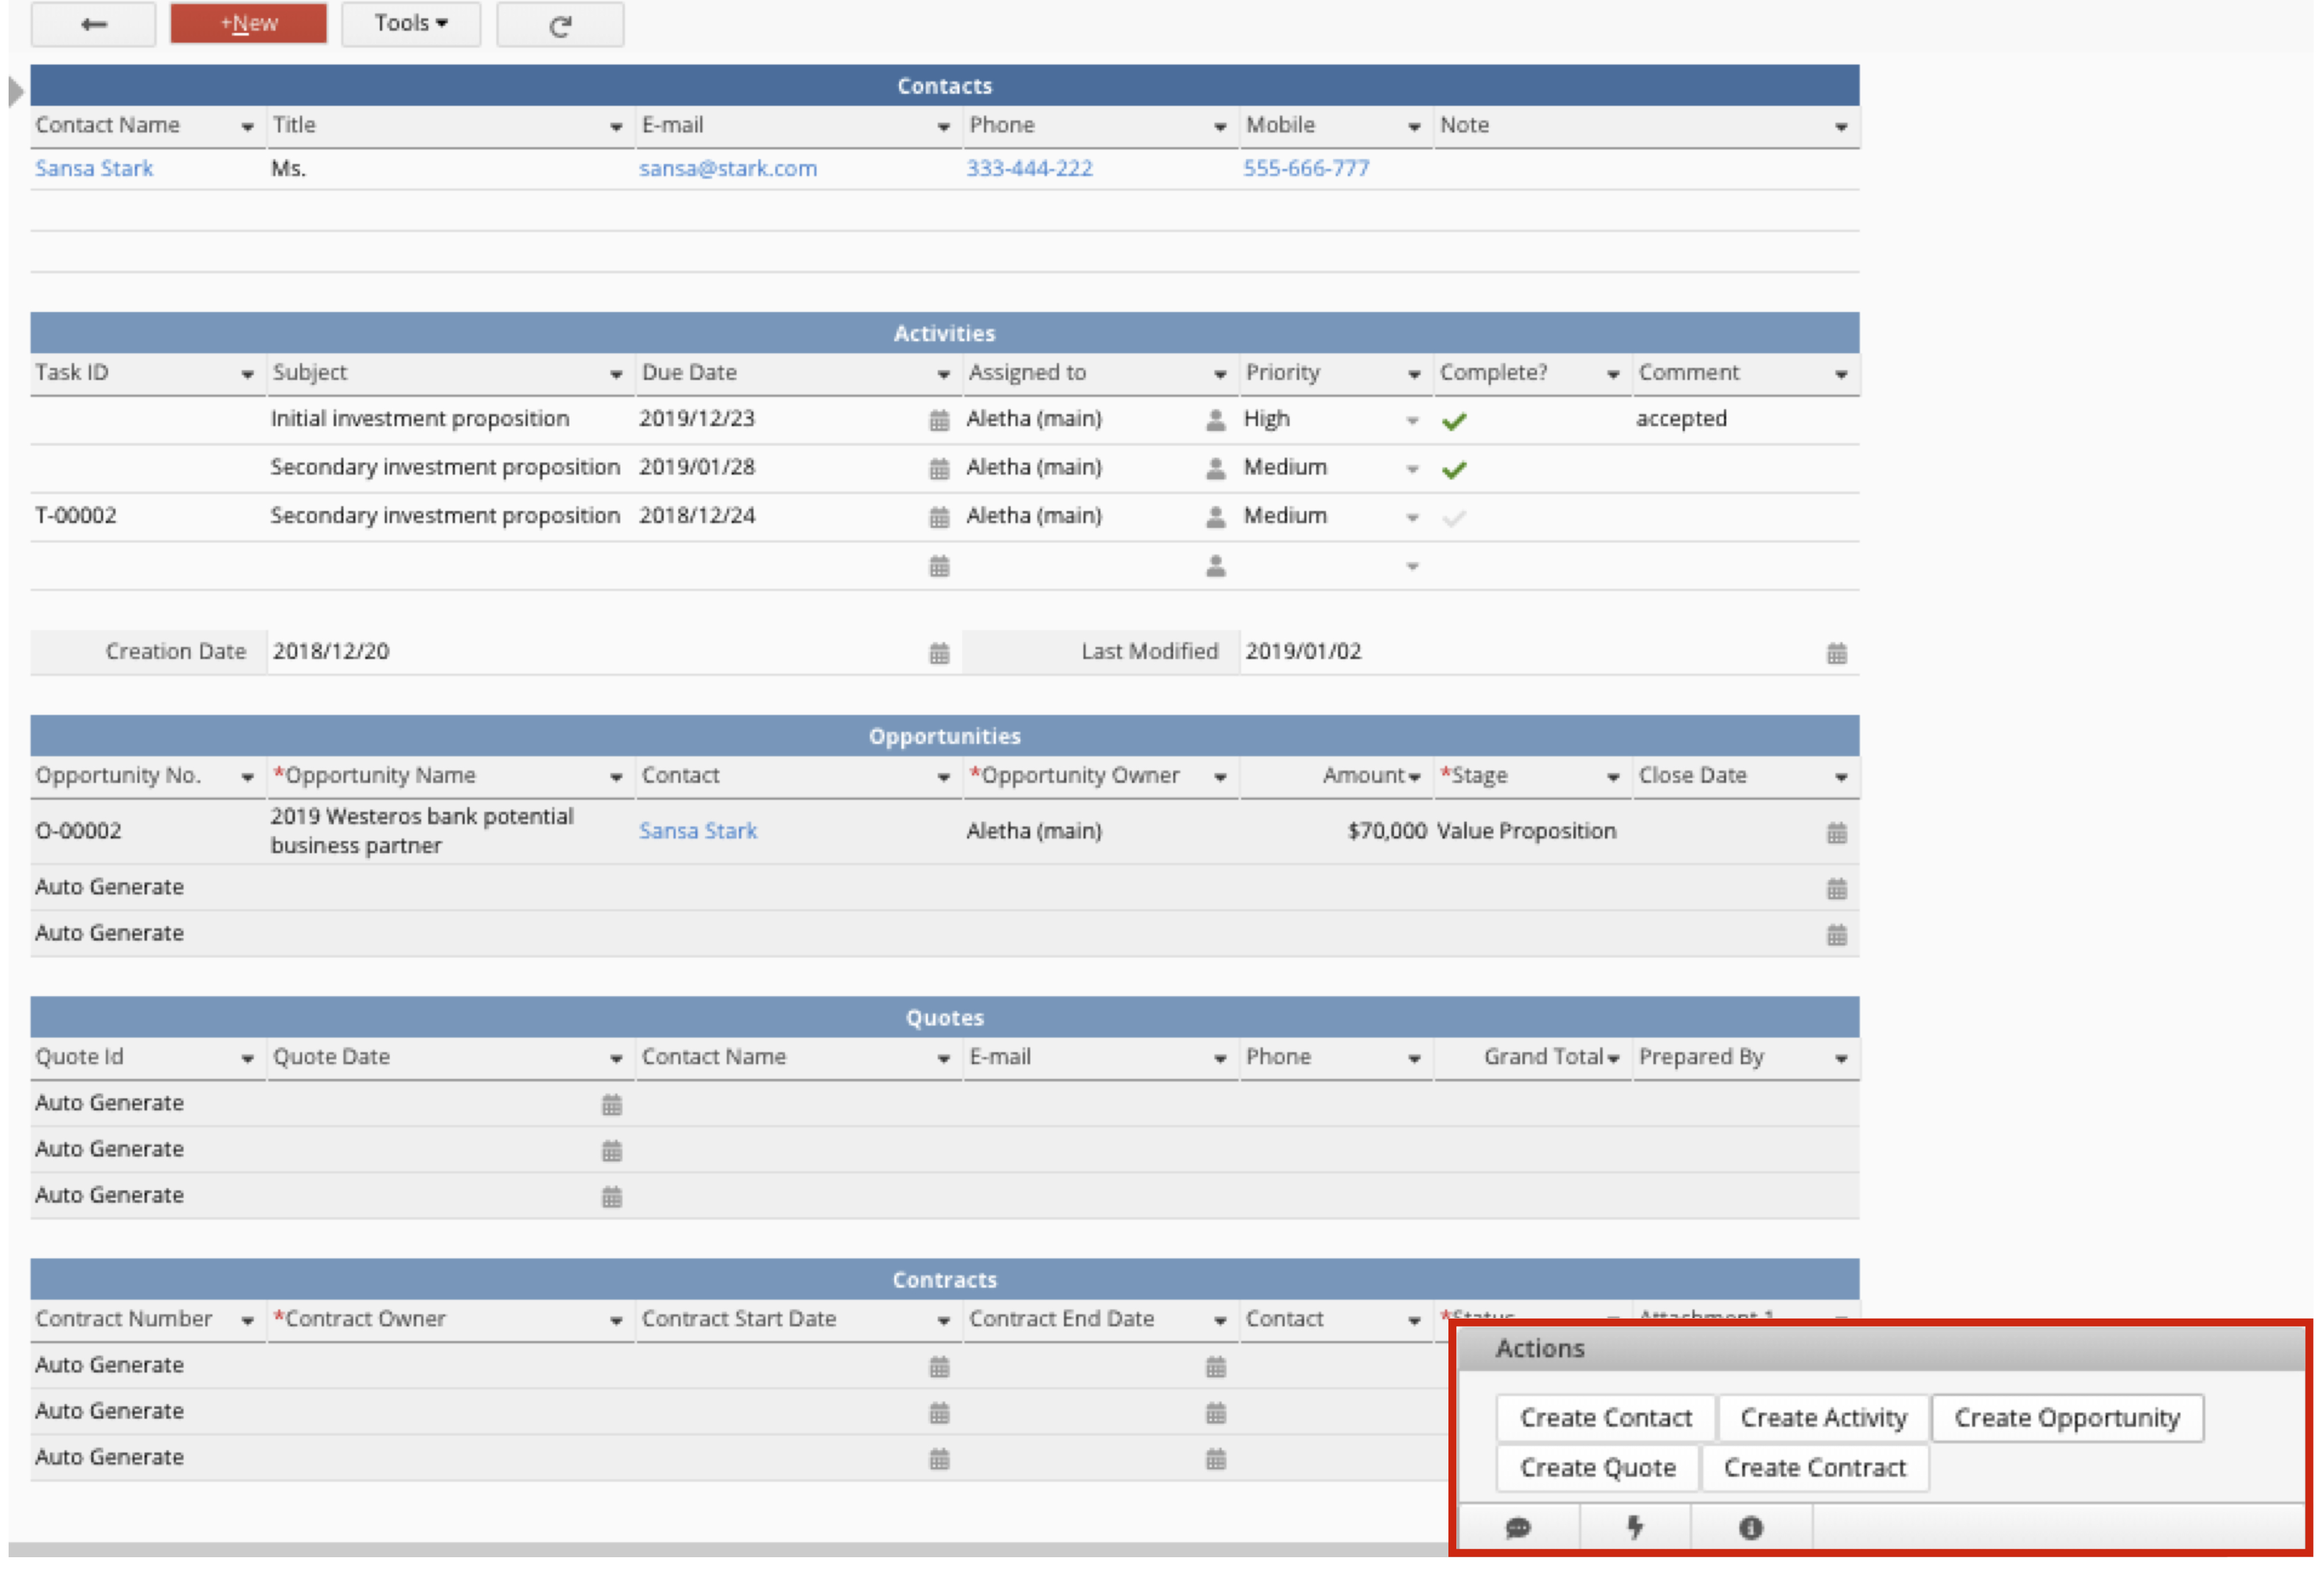
Subtable fields (Contacts, Activities, Opportunities, Quotes, and Contract): only Contacts and Acitivities subtable entries can be directly added from this sheet.

Those five subtables have independent source sheets, and data in those sheets will automatically show in those subtables. Beside Contacts and Activities subtables, the other three subtable (Opportunities, Quotes, and Contract) fields are set to "read-only" as a safety measure and as a suggestion to users that data input should be done in the source sheets.
You can also create new Contacts, Activities, Opportunities, Quotes, and Contracts entries under this Account in their source sheets by clicking on the action buttons (the thunder icon) indicating the names of those sheets on the down right side of the form page.
3. Contacts sheet
In this sheet, you can add any contact information you’d like to keep.
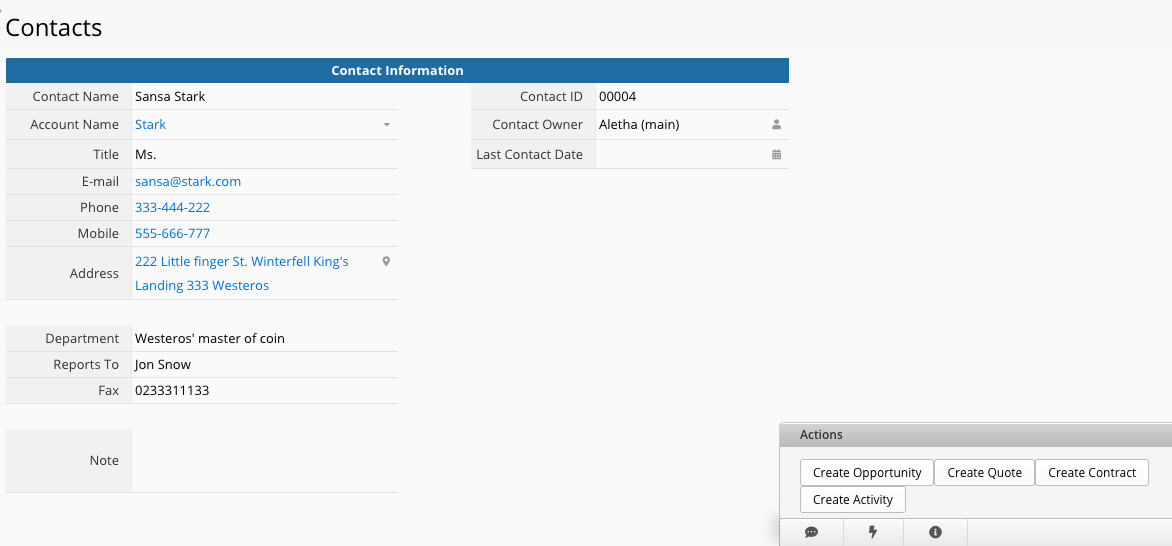
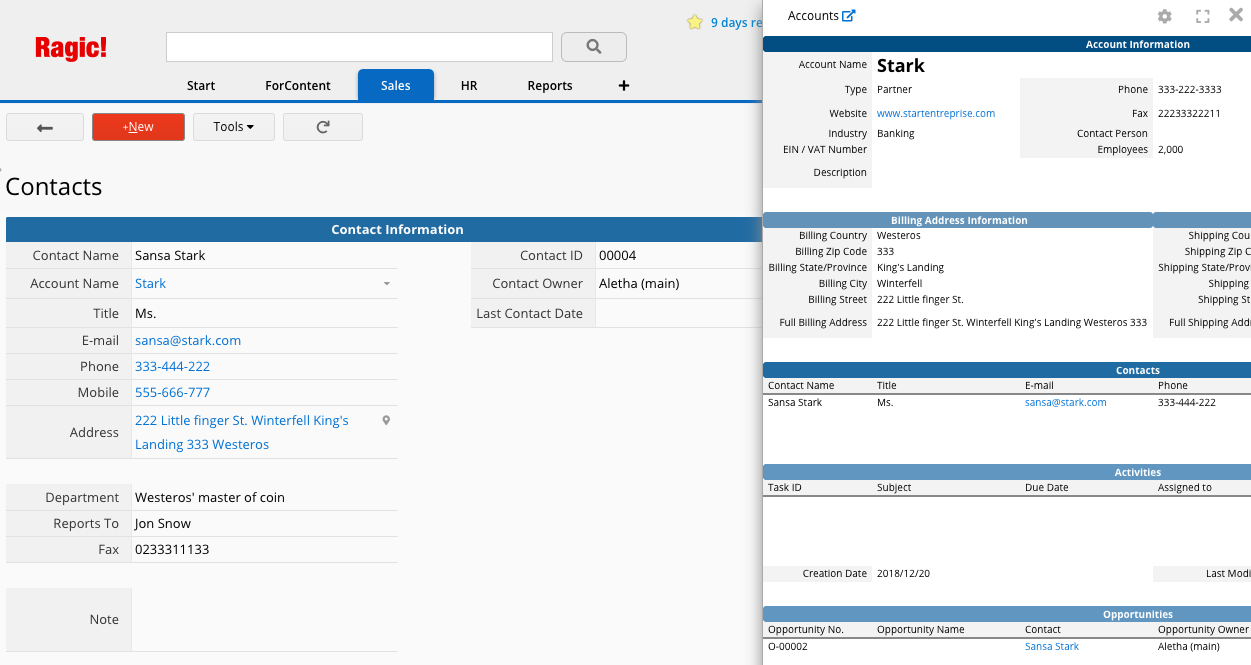
Since Company name field is linked to Accounts sheet, choosing an affiliated company of a Contact information in this field will show the person’s information in the subtable of the company’s Account form.
Likewise, if you directly add a contact information from the subtable in the Account sheet, the information added will also appear as a new entry in the Contacts sheet.
4. Products (CRM) sheet
Since one product may have multiple prices (e. g. one product having different prices in different seasons/ events), product information in this CRM template is recorded in 2 separate sheets:
1. The Products (CRM) sheet, where one product is recorded as one entry;
2. Price List sheet, where one price of a product is recorded as one entry.
In this sense, one product with 3 different prices will make one individual entry in Products (CRM) sheet and 3 individual entries in Price List sheet.
FYI, “Products (CRM)” sheet is actually a multiple version sheet of “Products” sheet in Sales Order Management template set, “Inventory” sheet in Inventory management template set, and Products (PO) sheet in Purchasing Management template set. This means that information in those sheets comes from the same source and that each entry added to the Products (CRM) sheet will be synced across other sheets, too.
Note: Following the above logic, you'll need to remember to set the product category to “Sales Product” in case you want to add entries to this sheet from the Inventory sheet (in Inventory Management template set) or Products (PO) (in Purchasing Management template set) so that the data will appear in the Products (CRM) sheet. (Note: “Category” field in the Products (CRM) sheet is set to hidden).
If you choose to add Product entries by importing data from Excel/ CSV files, remember to check the “set default field value” checkbox in the import advance setting (by default, the value of “Category” field is set to “Sales Product”).
Important when adding new entries to Products (CRM) sheet:
“Product no.” field will be auto-populated with serial numbers. If you have previously designated product serial numbers of your own, you may replace them with those numbers before saving the entry. But keep in mind that values in the Product no. field should be unique/ key values.
“Category” field is a multiple selection field. Only by choosing the “Sales Product” option will the data show in this sheet.
The options of the “Type” selection field can be added from the design mode.
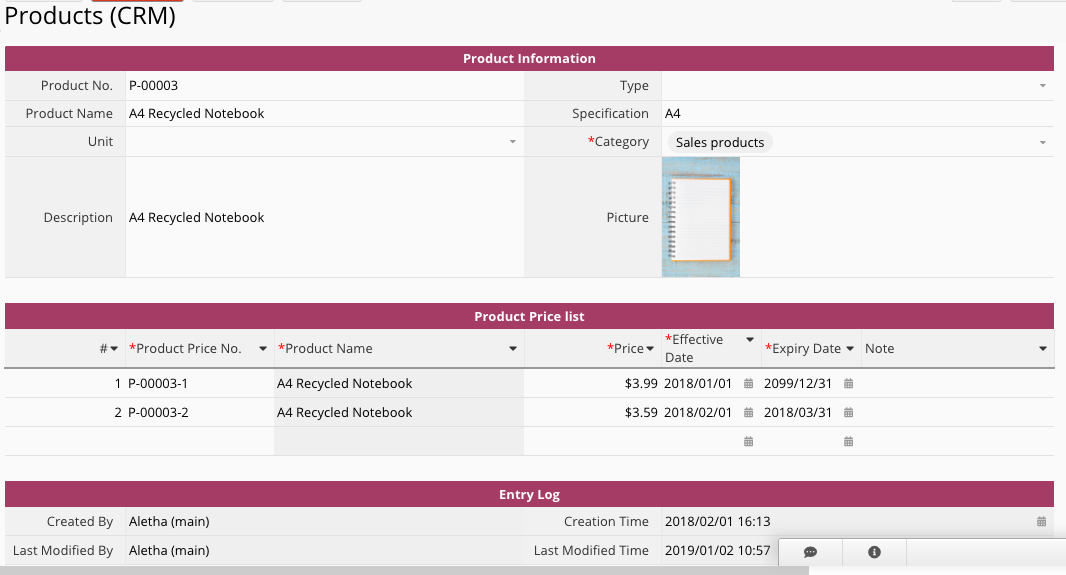
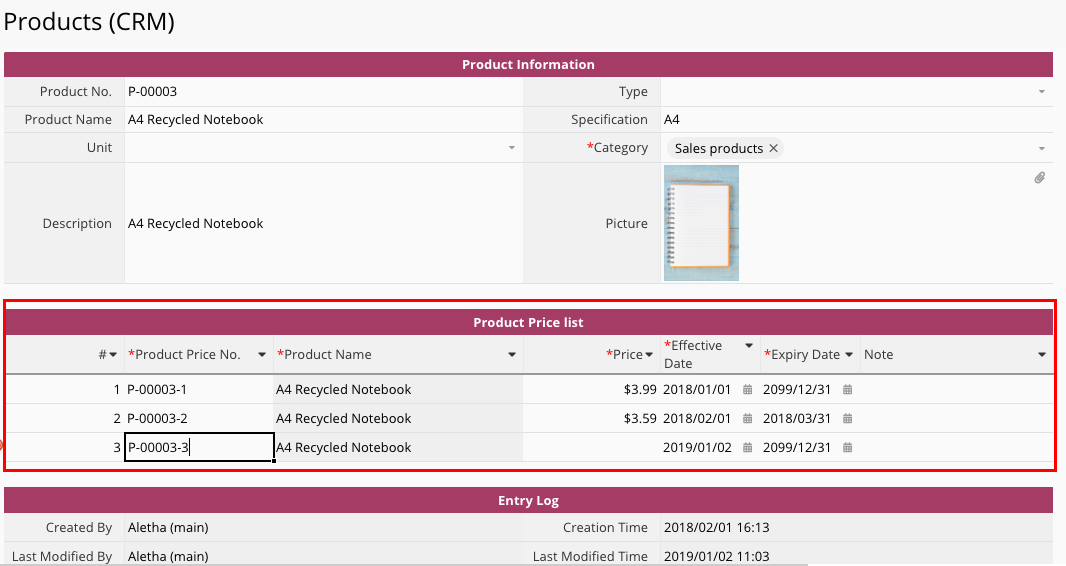
The "Product Price List" subtable in the sheet allows you to record information of multiple unit prices of a product.
Important details on Product Price List subtable:
Product Unit Price no. fields will auto-populate values generated from a formula which combines the string values of “Product No.” and “#” fields, creating unique/ key field values in the Price List subtable.
To avoid confusion, Product Name field in this subtable records the original name of a product (referenced from the Product Name field in Product Information general table), and is set to read-only. In case you’d like to record different names of the product in different seasons/ events, you may cancel the read-only setting on the sheet design mode.
After inputting the price, do confirm the effective and expired date of the price.
When you select a product in Quotes sheet, the price that comes with it is one of the unit prices (the one within the effective date, as filtered by the default setting) listed in this subtable field. (By selecting a Product #, the system will automatically load product name, unit price, and the original product no.)
5. Price List sheet
This sheet records multiple prices of a product as individual entries and is the original source from which data in the subtable of Quotes sheet is retrieved.
This sheet is created from the Product Price List subtable in Price List Products (CRM) sheet. Since all fields in this sheet are set to read-only, you’d need to add new entries or modify existing entries from the Product Price List subtable in Product (CRM) sheet.
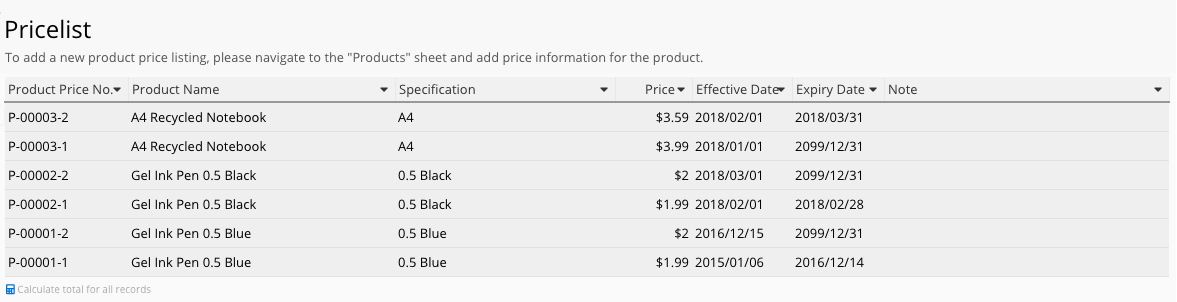
As mentioned previously, since the price of a product may change at times (regular price and discounted price, for example), one product may therefore have multiple prices. By managing the price information of a product in a subtable, you'll be able to view the history of the product’s price over time and maintain its precision in Sales Order.
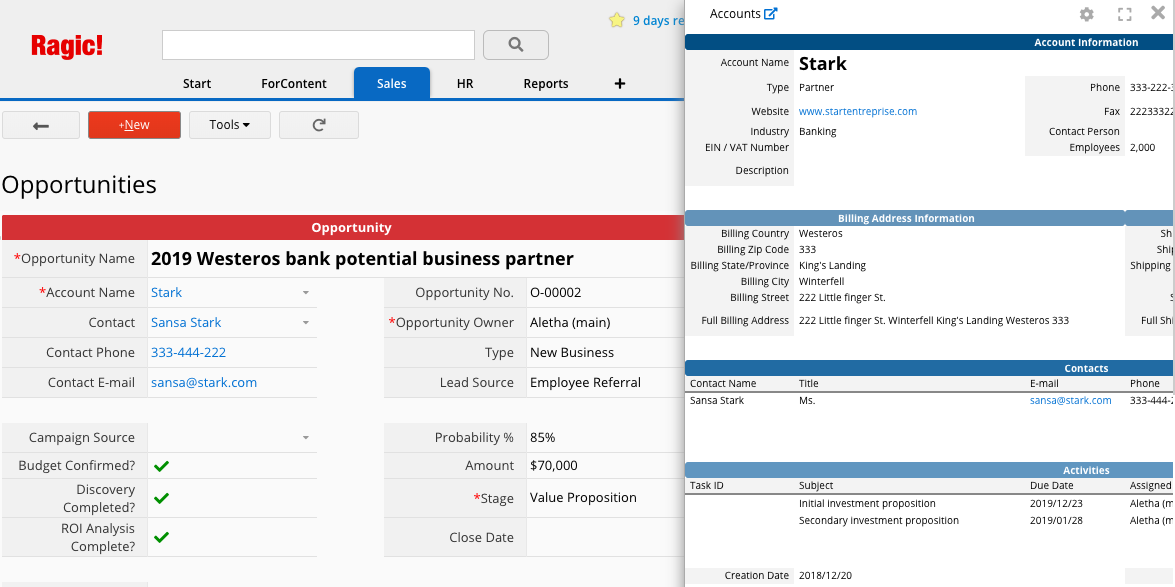
6. Opportunities sheet
This sheet records information on sales opportunities: the Opportunity Name, Account Name, Opportunity Owner, and Stage fields, which are set to “not empty”.
Account Name field in this sheet is linked to the Account sheet, from which you can choose Accounts (companies) and Contacts related to this sales opportunity. Dynamic filter is applied to the Contact field (which is linked to Contacts sheet), filtering out only the contact information affiliated to the selected company.
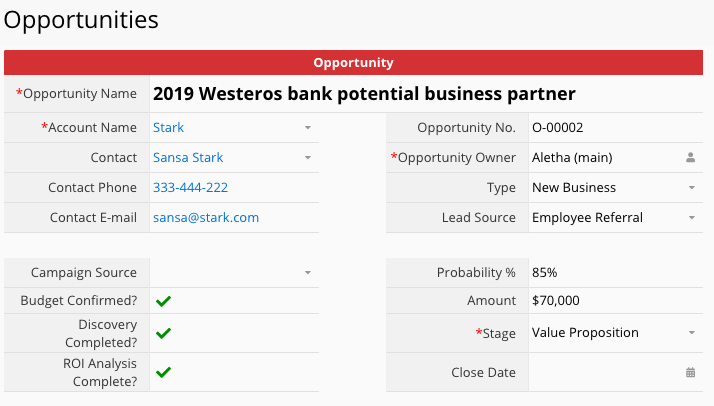
After selecting the Account name (the related company), information on this sales opportunity will also appear in the “Opportunities” subtable in the Account sheet.
7. Quotes sheet
Choose your sales quote target from Company name and Contact fields, which are linked to Accounts and Contacts, respectively. By selecting a contact, other information such as phone no., fax, and email will then automatically load and populate the fields.
The details of a quote are recorded in a subtable, allowing you to record multiple quoted products in a single quote as subtable entries. You will find that as you add more entries, the subtable will automatically expand downward. By selecting Product # (which will automatically load the Product name and the unit price) and inputting the quantity of the product you'd like to quote there, the system will automatically calculate the subtotal. Since Product # field is linked to the Price List sheet, and with the help of dynamic filter feature, it will automatically display a list of products whose effective price period is compliant with the quote date. When you input data to quantity, discount, and shipping fee fields, the system will also use the applied formula to calculate the subtotal, tax, and grand total.
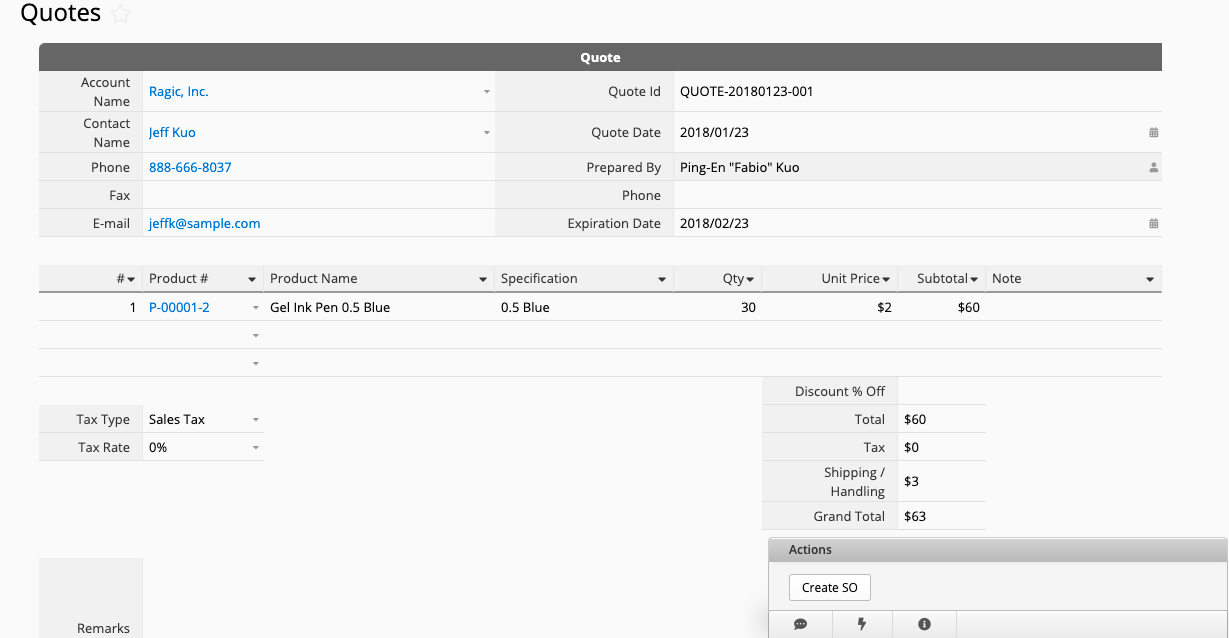
If you install “Sales Order Management” set template, you can also convert the record of the accepted quote to "Sales Order" by clicking the “Create SO” action button on the bottom right corner of the form page.
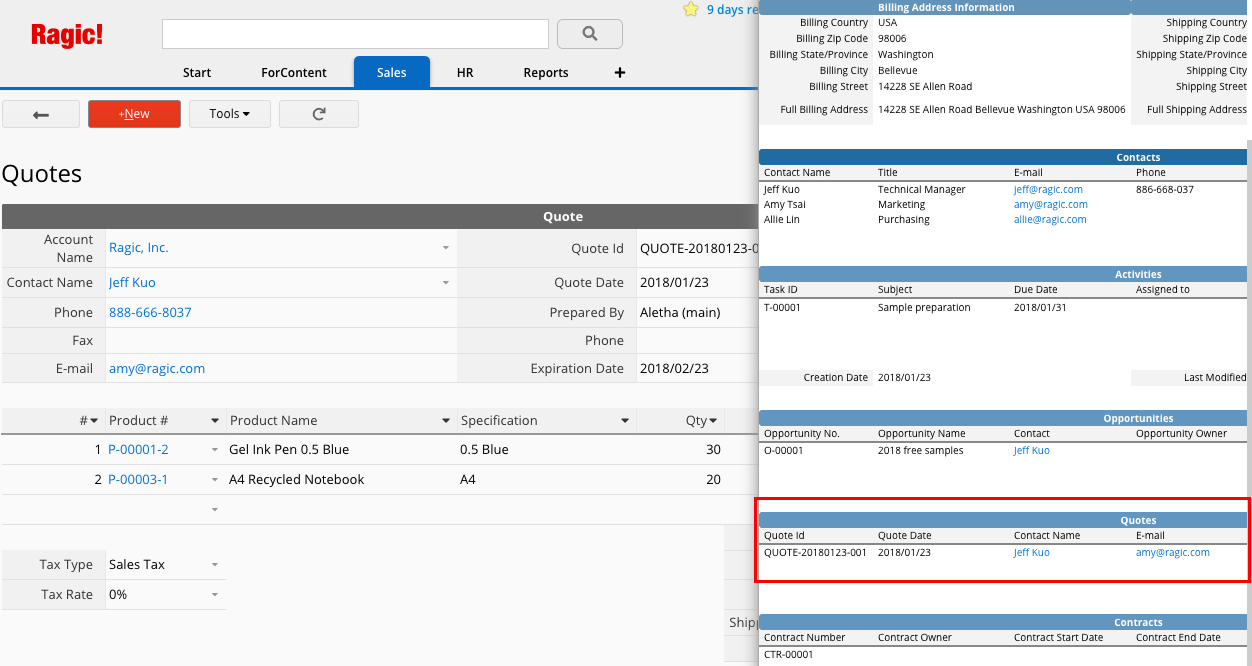
After entering the Account Name, this quote record will automatically show in the “Quotes” subtable entry in the relevant company’s Account sheet.
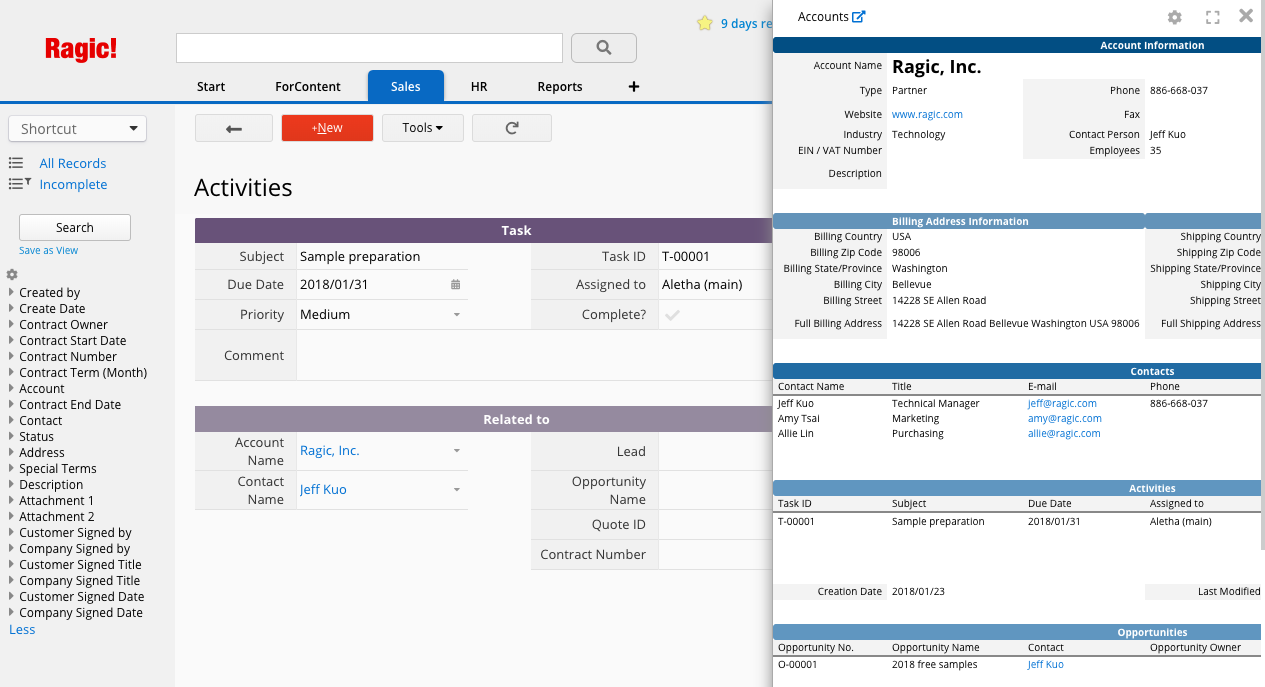
8. Activities sheet
Activities sheet applies a default filter which filters incomplete activities.

You can add the subject of the new activity entry, set the due date and activity status (complete or not), as well as the people you’d like to assign this entry to.
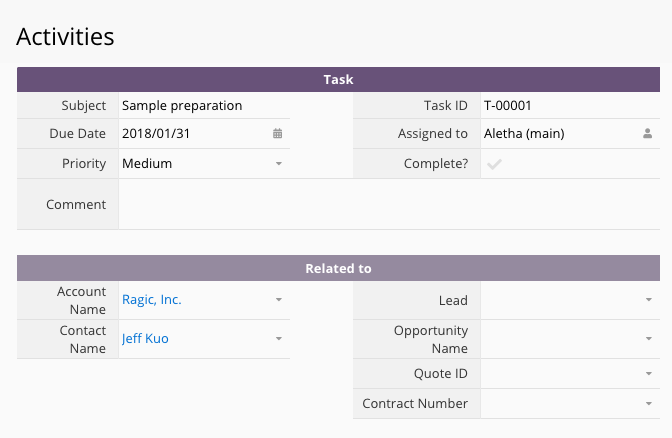
The information inputted to “Related to” section, such as the client (company) to whom this activity is related, will also appear in the company’s Account sheet ("Activity" subtable).
9. Contracts sheet
This sheet stores information on contracts made between you and your clients (companies). In this sheet, you can record the contract owner name and other information on the contract date validity and status, as well as the company’s related accounts and contacts (this entry will also be shown in the “Contract” subtable of Account sheet). You can also upload the contract file in the attachment field under the "Description Information" section, as well as the signature information in the table below it.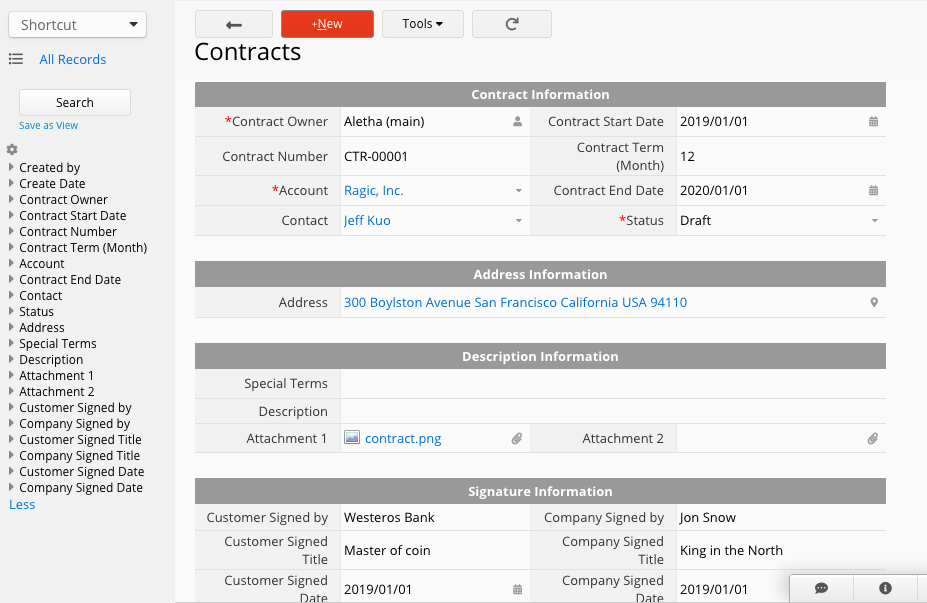
Category: Applications > Templates

